Wednesday, February 26, 2014

Sewing Class: The Workroom


As a child, I wanted to design my own clothing, and I suppose this is why I cherish online shopping so much. I get a very specific idea of something I'd like to wear and I won't stop until I've found that tiny little eBay shop in Estonia that charges an arm and a leg for this one style in the right colour. This childhood dream could have saved me loads of money and scrounging, but it's just that the sewing machines are out to get me.

This is what I told myself when I was 12 and threw my arms up in despair as that damn sewing machine chomped up a piece of fabric for the 20th time. With the exception of half a semester of economics and my Mum showing me once or twice, I had no real sewing machine experience growing up. I just know that every time I tried to use one, it never worked out for me (assuming I ever got far enough to understand what came after that bobbin business).

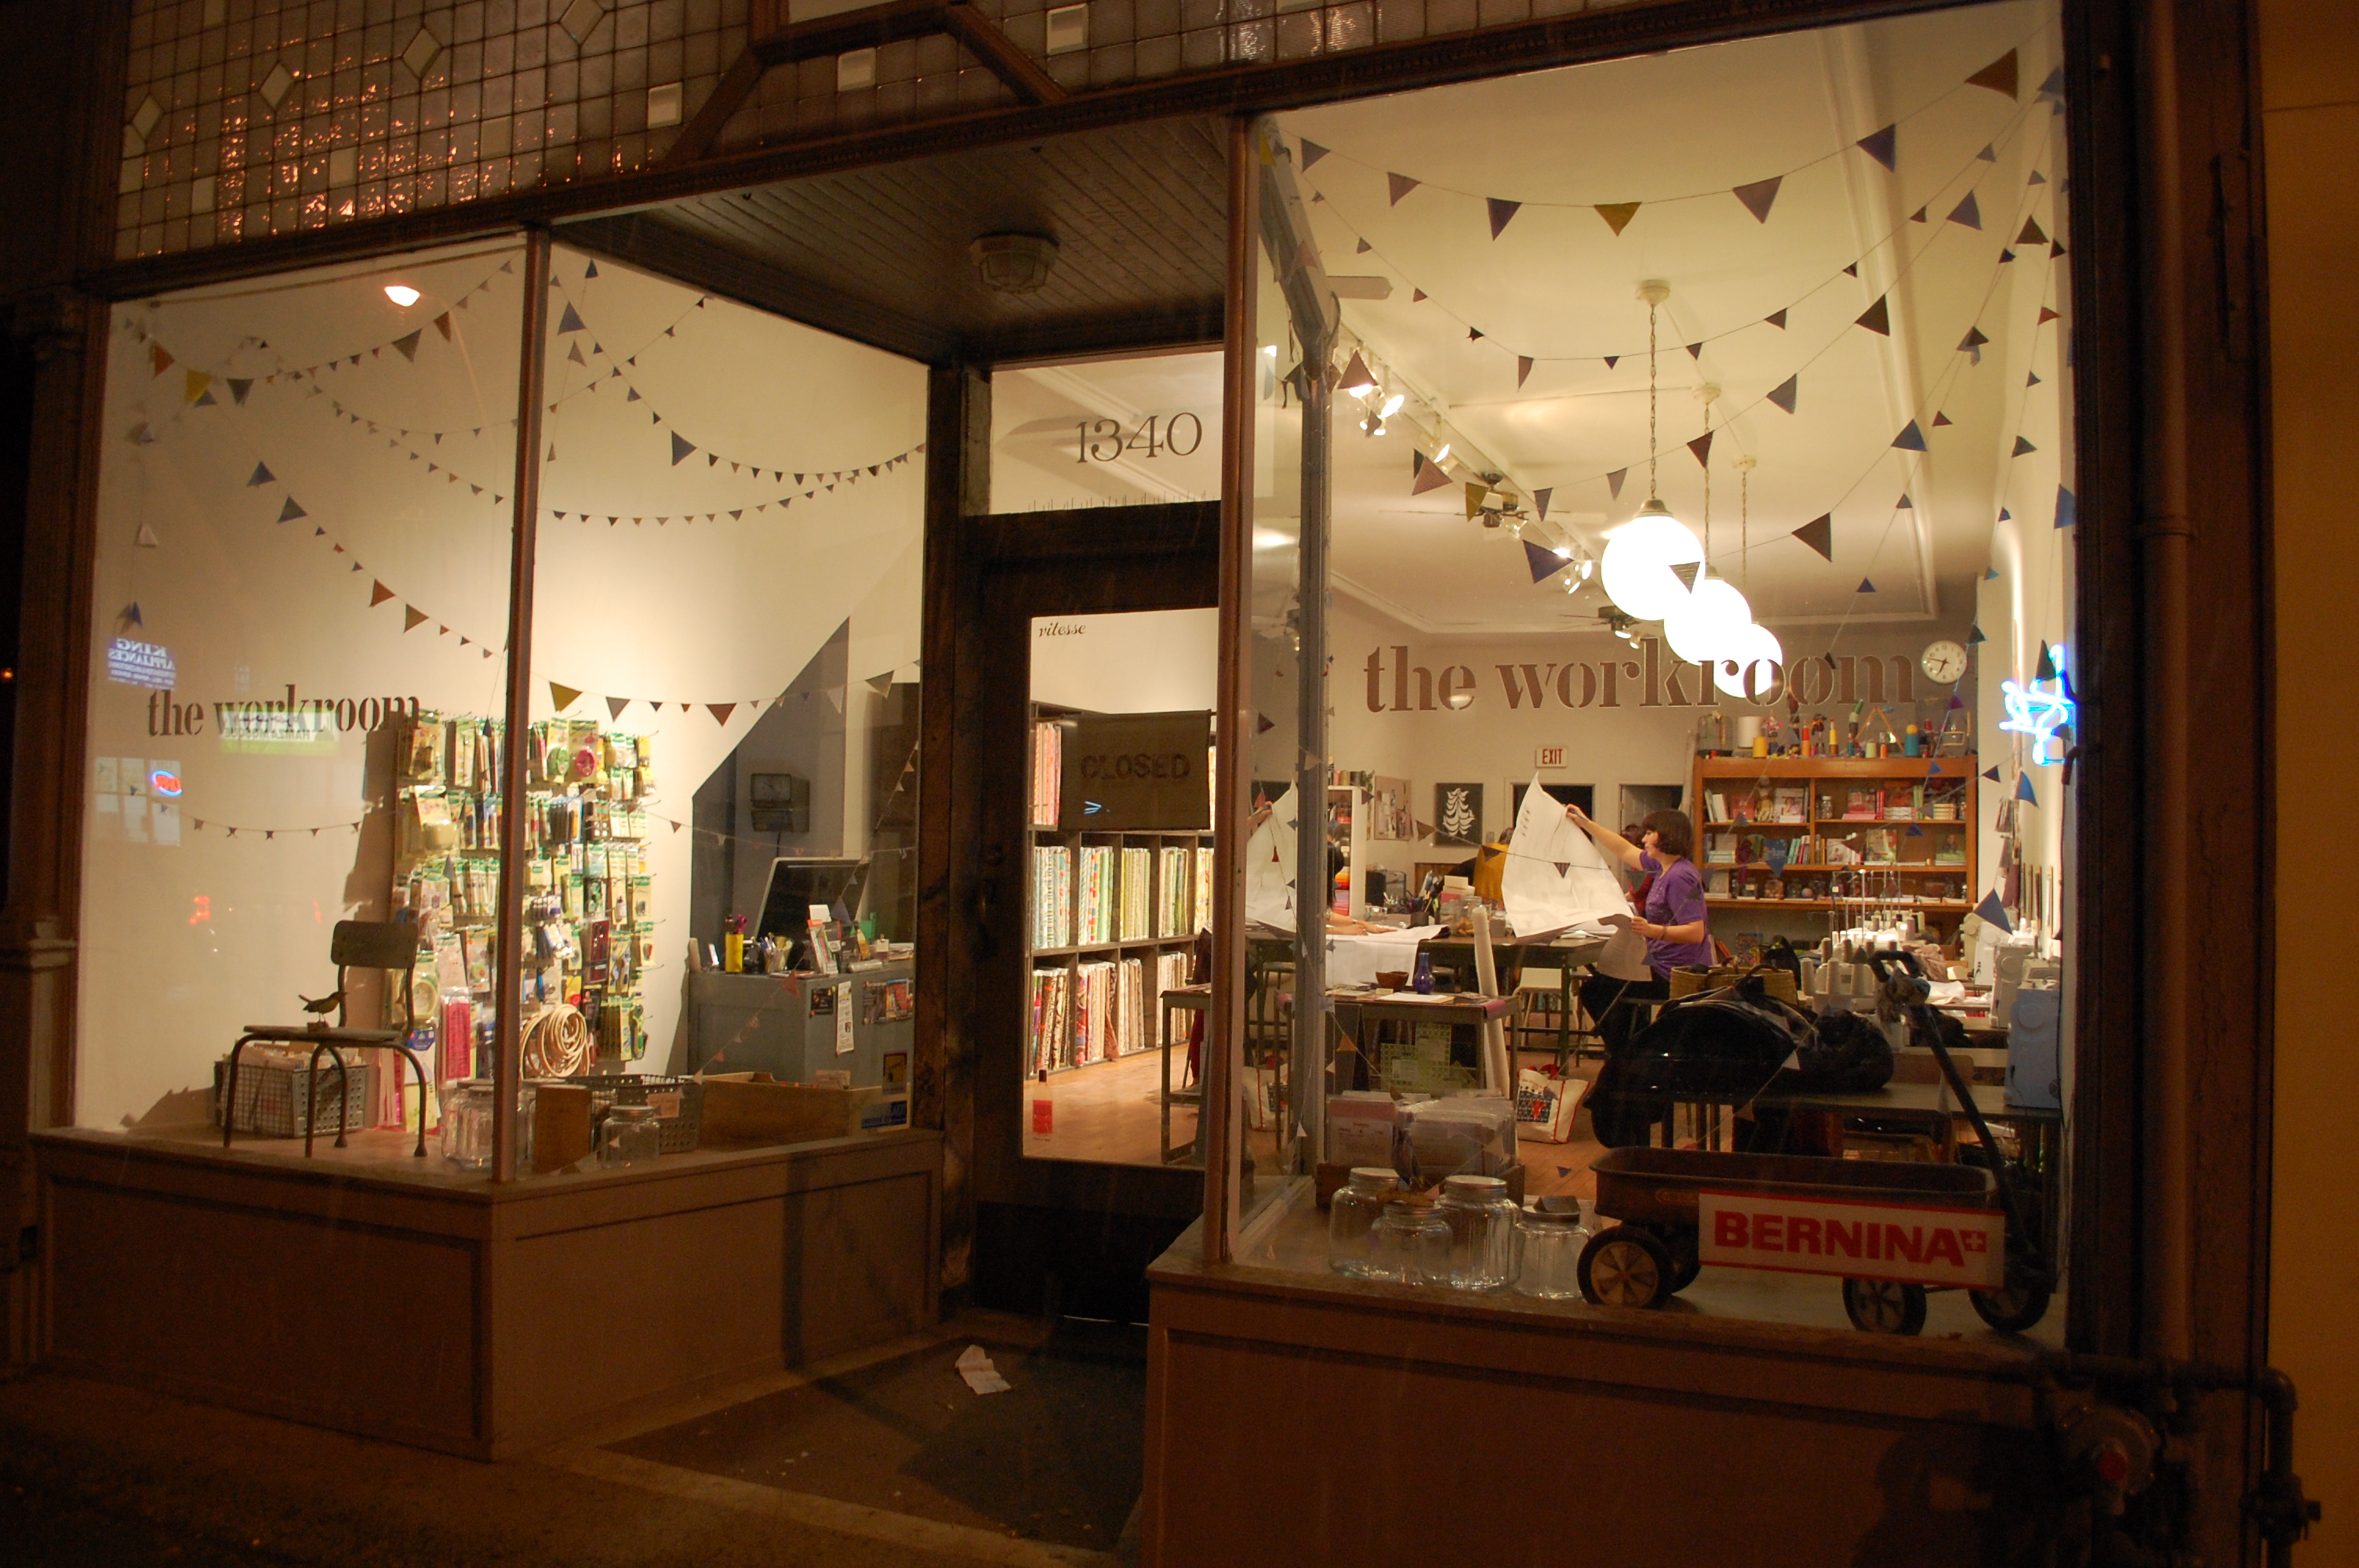
When we moved to Parkdale, I immediately noticed the storefront a block away call The Workroom, and it was adorable. Every evening, I would see people sitting at the dimly lit sewing machines working away, and it didn't take me long to look into their sew-by-the-hour; $8 an hour. I was interested until I remembered my previous experiences...
Hm. Maybe they have classes. Sure enough, just what a budding seamstress needed: $55 for a 3-hour course in Sewing Fundamentals, made specifically for people who have never touched a sewing machine (or have the kiss of death when they do). This class is also required if you ever want to sew by then hour at The Workroom. There are dozens of other classes including cross-stitch, dying, stationary printing, quilting, pattern design, and embroidery (among how to sew basically anything from your own clothes to upholstering furniture). Prices range from $55 (sewing fundamentals, leather clutch purse, alternations, etc.) to $220 (pattern sewing, japanese dresses, upholstery, etc.), with some higher price points for specific quilting projects. I hope to take some more of these classes as I get a bit more comfortable with the machines, but for today, this is all I wanted.

Classes are typically a couple evenings a week with a handful of weekend classes, so I booked super early (like, 5 weeks early) for the next available Saturday class. With only 6 spots in each class, it books up pretty quick - half of our class got their sewing machines for Christmas, so you can see what sort of wait time there is for these weekend workshops.

The class would have us making an envelope cushion cover for a 16" cushion. You could either bring your own supplies, or buy them at the shop. I opted to buy my fabric from Designer Fabrics (whoa, that website) but got the thread and pillow form from The Workroom ($3 for Mettler thread spool, $9 for a 16" inner cushion). It was the perfect class atmosphere when walking in; sun pouring through the bay windows, creaky hardwood floor, colourful fabrics lining the walls; in my world of cubicles and boardrooms, it was refreshing to be in a place that actually wanted you to enjoy yourself while learning.
Not my photo, but there was a dog there as well. Maisy trotted and lay around the shop, occasionally getting tangled in a sewing machine or two.

The first 45 minutes of class was just talk; how to thread the machine, stitch types, spacing, learning what each part does, what not to touch, common mistakes, common remedies; I don't think there's a single feature on the machine that I'm left wondering about. Most of us were taught on new Bernina machines with digital displays, but there are some manual machines for those who want something a bit more relatable (unless you have $1,400 lying around).
Once we got into sewing, we learned to cut from a pattern, overlock the edges, and iron the folds as we prepared to sew. I'll definitely be a fan of outlining the pattern with chalk because cutting along paper? Nope. Once the groundwork was laid out, we got to sewing. I can't really explain this part without being both long-winded and boring, so let's just say it turned out to be this!
Really quite proud. The seams are straight, the corners are squared, and it's designed to be just small enough for a firm, tight fit.

I'm definitely interested in taking more of The Workroom's classes (I'd love to work with leather or alter my own clothes), but in the mean time, this is all I need! As I mentioned in the first post, I want to make my own curtains, and this is really simply enough! The hardest part now will be finding a fabric that works in our tiny living room. Any suggests for a white room with brown carpet, black furniture, and turquoise accents? Didn't think so.

I'll be sure to update here when I make my curtains and see how my sewing knowledge holds up.

Saturday, February 22, 2014

Out With The Old: Replacing Kitchen Necessities

Apologies if this seems incomplete. This was posted a week ago and for some reason reverted itself to a draft and erased everything I finished! 

This week, I was able to replace 3 items in my kitchen that have been on the chopping block for a while; the garbage bin, the dish dryer, and the kettle. In a previous post, I had mentioned wanting to replace the kettle and dish dryer, so I wanted to provide a mini-review on all of these items and maybe a few points to think of when replacing items you're likely to be using every day.

Garbage Bin

Garbage bins are not really something I find myself that passionate about, in fact I only wanted to replace it because I had been using the same $20 white Rubbermaid one since 2007. Even that was only ever supposed to be a temporary replacement for the tiny push-pedal bin my roommate currently had in our kitchen.
I realize I didn't take a "before" shot of the kitchen from the right angle to show the garbage can, but this is what was there:
I don't really understand people with little garbage cans in the kitchen; I've always seen the kitchen as just a giant garbage generator and it's only doubled when your city doesn't recycle plastic bags. As a guilty confession, we also don't compost. We were given a small compost bin on move-in day so that it could be taken out to the green bin on a regular basis, but between the lack of space and what might happen if we didn't take it out frequently enough, I opted out. I really should start though, because my fridge crisper spends most of its time as a composter anyway...

A surprising amount of thought goes into a garbage bin replacement. Factors to consider:

  • Style (click to see what I mean, as I am not a connoisseur of wastebaskets) - open-top, step-cans, swing-top, in-cabinet, stacking, touch-top, sensors, visor, or your good old fashioned garbage can
  • Material - plastic, metal, wood, wicker. I imagine there are poor decisions too, like hemp or fabric.
  • Finish/Colour - if it's metal, is it brushed or painted; if it's plastic, is it metallic, what colour, etc.
  • Shape & Capacity - this could really be expressed as a ratio if you know exactly what you want, but you need to be able to fit it in the space you have, while making sure it's big enough to serve its purpose. Tall and skinny could fit the same amount of short and fat, so see what's practical for your space.

I wanted swing-top, brushed metal, tall and skinny. I can't even show you a Google image of what that looks like, so obviously I didn't get it. Anything that would look like that would be well over $100 anyway, so it was time to compromise. The only thing I could find in my price range was an Umbra can that was plastic made to look like metal, and even that was $50. Hell no. All metal seemed to be $80 up and I just can't justify that amount of money for something that holds garbage.

So, how did exactly I pay $3.25 for a brush aluminium garbage bin? It helps when your workplace holds a contest for best Olympic outfit and you have a 2010 hockey jersey which earns you the prize of a $25 Homesense gift card. Homesense is great for items that are a little bit different, but it hasn't actually occurred to me to explore it in this little transformation. Until my last trip, I was considering this, despite my distaste for foot pedals.
However when I went to actually buy it, I walked in and saw a touch-top aluminium one waiting at the front door. Price: $70 marked down to $25. I was - and still am - a bit hesitant with touch-tops just because it's a little plastic part that makes the whole device function. That being said, this was a 50L can as opposed to the 30L, and for $10 cheaper. In the end, I was paying the tax on $25 so what do I care if this $3.25 garbage can ends up falling apart in a month?
... I care. I do. Please don't die.
My final deciding factor: when I went to compare these two side-by-side, the bottom of the step-pedal popped off. We have a winner!
This also happens to fit much better because it's round  and means the cupboard beside it (where our recycling is kept) can be opened a little wider than before. So far my favourite replacement.

Kettle

And in second place, the little kettle that could. This past weekend I performed the purge and included the electric kettle in the Goodwill bags, since I had just gotten the parcel slip notifying me that my new one was waiting for me at the post office (the kettle that I expressed adoration for here).

I've never been good with measurements. Joke all you want, but I thought a 6-inch-wide kettle would be the size of a normal kettle, so when I was handed a box no larger than a bag of sugar, I was a bit miffed. A kettle emerged, looking a bit different from what I thought I saw in the photos.
Cute as a button though, right? It doesn't show in photos but it's actually quite dirty near the handle and spout. As you can see, the inside of the handle is chipped away in a straight line (which did not look this noticeable in the photos), and there's also a solid black mark near the bottom on the other side. It looks like someone used this for camping, but a good clean would have been appreciated before sending it out.
On the stove, for scale. It's the exact size of a small element and I'm guessing just barely fills my tea pot. In the end, it's all I actually need, and it's a nice little piece that serves its function. It also means it not only takes up zero counter space, but won't even be a problem if the stove gets a bit crowded (which it tends to do). But as a tip for those of you who like to shop online, make sure you understand how large an inch is before ordering.

Dish Dryer
If you recall, I ordered this from Amazon to replace the plastic cesspool I was using before. It folds and takes up essentially no room, while also never developing a greasy red ecosystem for you to wonder about in a couple years. However, I wish it was just an inch wider. I didn't pay attention to the "Junior" part of the listing and it seems that it's only meant for small dishes; it can hold my large plates, but I don't have much faith that a firm nudge would knock them all down. On the spikes meant to hold cups and glasses, it only holds shallow glasses that need the lower sense of gravity for its own support. Taller glasses just slip right off. However, I'm keeping it as motivation to not let the dishes pile up, as it still fits a good amount for its size.
Something else I didn't consider: nowhere to put cutlery. I will have to investigate options for this that don't include just throwing forks wherever.
Since there's no draining tray, I invested in two microfibre drying mats from Kitchen Stuff Plus; one fits perfectly under the rack with some room to spare, while the other will go elsewhere to accommodate large pots and bowls (which really never fit in the old rack anyway).

Thursday, February 6, 2014

Organization Part One: The Kitchen

Warning: this is long, which is why it's taken so long to put together. Consider the photos to be dividers, if you're interested in a particular section.

Despite my petite abode, this current kitchen is probably one of the nicest and most practical that I've lived in over the years (except yours, Mum & Dad). Most of my other apartments had homemade cabinets, too few cabinets, shelves too far apart, no counter space; it was just never the right combination.
The kitchen at my old bachelor. Much larger and brighter, but homemade cabinets with very poorly utilized space inside. The cutlery drawer is that white ajar panel under the counter and was not a drawer so much as a wooden box inside of another wooden box. And yes, I chose that colour of yellow.

The only things I dislike about my current kitchen setup is that it could use a tiny bit more space, and that space would ideally house a dishwasher. I would give limbs for a dishwasher. Otherwise, there isn't any wasted space, there are cabinets everywhere there could be, and the shelves are many with just the right amount of space.

... and yet, of everywhere I've lived, I've never had enough storage space. I think kitchens might just be one of those things where you have to own one of everything ever made if you ever want to be able to have a useful kitchen. I've pared down as much as I can and yet I find I am left wanting.

I recently journeyed to the wonderful, magical land that is Solutions, where everything is made of wire and plastic and only wants to make your life easier.
If you're not hyper-organized, this place will turn you. From the moment I set foot in these stores, I wish for everything to have its own bin and every wall to be made only of shelves. It seems this store also sells good intentions, because I bought some sock organizers a year ago and only recently used them to organize my drawer... of utensils. The prices aren't bad either - about what you would expect for some wire shelving and plastic jewellery organizers  - but I admit there are probably a couple things here you could find at Wal-Mart if you're really looking to save (literally) a buck. The selection isn't even a battle though, so if you're actively trying to do an overhaul, why would you? I don't have a car and infinite amounts of patience to deal with the crowds at my local Wal-Mart, so I risk it.

There's also Kitchen Stuff Plus; another franchise armed with good intentions, this is more for gadgets and kitchen furnishings, but there are some great storage components too. Specializing in, uh, kitchens, there's also some crossover into living rooms, dining rooms, and bathrooms. About the same price structure as Solutions (by the way, they both stock Umbra), and they're great at having clearances and warehouse sales in places that urbanites can't access.

Shopping at Solutions provided for a very large, clumsy, and destructive trip home on the subway (and through a grocery store...) since I ended up buying large wire shelving. In the end, this was my shopping list for the kitchen:


The beauty of organizational stores is finding what you didn't know you needed. My first example was the wrap rack, which is specifically made to hold boxes of aluminium foil and sandwich bags. The idea of having one piece of hardware to specifically hold one kind of item seems ridiculous, so I bought it.
What? Up until this moment, foil and bags had been raining upon my head from the top shelf of the highest cabinet! They were those things that on moving day I kind of pushed to the side and realized I hadn't left room for once I unpacked all the cabinets, so they lived on top of a casserole dish. This was $5 well spent, honestly. 
Addie's tip for morons: Make sure to measure the boxes you'll be using it for before installing the rack. I initially drilled the holes an inch too high and the foil wouldn't fit. *grumble*

Second on the "didn't know you needed it" list (and a preview of my newly cleared counter) is the stemware holder! I'm a bit miffed - I planned on installing this in our pass-through liquor cabinet so the glasses could hang and look prettier, but it ended up being too wide to fit in there. With the recent revelation that I would never be needing that cement wall by the sink, I decided to fill in some of that empty space by hanging my glasses over the sink. I also take comfort in knowing that this location means I'll never have to fill my dish drainer with giant wine glasses again.
Addie's tip for morons: Empty the above cabinet before you start hammering into the bottom. Just as I was listening to my beer glass collection clink and thought to myself, "I should probably empty this", I heard the shatter of one of my favourite glasses.
I didn't know I needed it until I knew it it existed. Once I moved the stemware from this liquor cabinet, I saw the perfect opportunity to display my beer glass collection, but was acutely aware of how large my collection was. I would have been (and still would be) happy with some clear plastic shelves to stack, but that was not an option. When I first discovered these cabinet organizers (primarily used for spices) in clear plastic, I thought of this immediately and returned to Solutions for just that. Of course there isn't a perfect size (this one would ideally be 6" longer), but I've stacked what I can on the 3 levels so that you can see the glasses (not from my height, obviously). The ends are stacked in front and on two square vases that don't get used much. Ideal? No. Especially since I now can't open the front part of this cabinet since I don't know how much the glasses are leaning, but it's freed up more cabinet space than you could know.
This has been my favourite kitchen organization so far. I've cleaned out and organized this cabinet more times than I can count, but I would need one cleaning wipe and somehow it would trash the entire cupboard. I'm happy to say that since putting in these expanding shelves, I've used many items and everything is still where it was. As you can see, I fooled myself into thinking I was organized with a cleaning tote. It looked so stylish. It had a handle. How could I have gone wrong?
You'll notice the dish drainer is no longer present. This was initially an accident, but my folding dish drainer arrives tomorrow so who cares! Paper towels have jumped cupboards and now reside with the linens (more on that later).
Paper towel holder has re-located from the counter to the cupboard. One shelf is for laundry, one is for cleaning, middle section is everything Swiffer.
Yes, the spoon served a purpose. I have so many rolls of tape that I had them on the spoon wedged into the cleaning tote... okay, I'm making myself sad now.
I'm happy to say this also resembles the "after" photo! I added in the small shelf helpers to avoid the stacking scenario I had going on. You know what's stupid? 12 cabinets and only ONE contains food. My goal is to make so much room in the kitchen that maybe I can have one and a half, like the dreamer I really am.
I'll admit it's hard to initially find a system of what goes where, but it's been so much easier to navigate just knowing the different levels.

I don't have a "before" photo of the baking cupboard, but imagine those Rubbermaids just hanging out in the cupboard with stuff pouring out and stacked on top. It's not much different, of course, but at least now I'm able to keep things like the food scale and rolling pin in good company. Again, more shelves. Useful, but did create a problem when items were too tall (like the now orphaned flour). Will probably have to re-visit this in coming months.

BEFORE & AFTER
It's not done yet, but there's significant progress. Obviously there's the knife block and the paper towels, but it also dawned on me that my cooking utensils bucket was designed to be hung on this rail. Duh. I also realized I had a smaller matching one that hadn't been used in years (all IKEA, by the way) so I tossed the plastic buckets for these. The baking trays are meant to be temporary, but for reasons I don't care to explain, they tend to spend a lot of time out of the oven drawer, so we'll see.
A change I made before I started this was those under-shelf baskets over the stove. Had them for years and they were a bit useless, but I re-purposed them as fruit & veggie baskets so that I could (you guessed it) clear up more counter space.
To come: dish drainer, new kettle, more shelf helpers for my larger shelves under the counter, possibly another storage rail for pots and pans.

I'm exhausted just reading this. If you've gotten this far, thank you for a) reading all of this, or b) skipping to the last sentence after skimming.

Any suggestions for further kitchen harmony?